

Create A Planet in Photoshop
A guest tutorial by Bill Tucker

Overview
Create a Realistic Planet using only Photoshop
This tutorial will guide you through the steps involved in creating a realistic planet render in Adobe Photoshop CS4 & Greater. All assets will be created in photoshop. A basic — intermediate skill level in operating Photoshop & basic familiarity with the interface is assumed in this tutorial. The provided keyboard shortcuts are for Microsoft Windows; if using Mac OSX, replace "Control" with "Command" in any given keyboard shortcut containing the control key.

Step One
Create a new Photoshop Document
Open Photoshop. Create a new document (control+N or File/New...) named "surface_texture" that is 850 pixels wide by 850 pixels high at a resolution of 72 pixels per inch with Colour Mode set to RGB Colour (8 Bit) and Background Contents set to transparent.

Step Two
Set Default Colours
Set the foreground colour to Black (#000000) & background colour to White (#FFFFFF). This can be done by clicking the "Default Foreground And Background Colours" button above the colour swatches in the tool pallette (as seen in the screenshot), or by simply pressing the "D" key.

Step Three
Render Clouds
Render Clouds by opening the Filter Menu then to Render/Clouds, resulting in a similar image to the screenshot.
Step Four
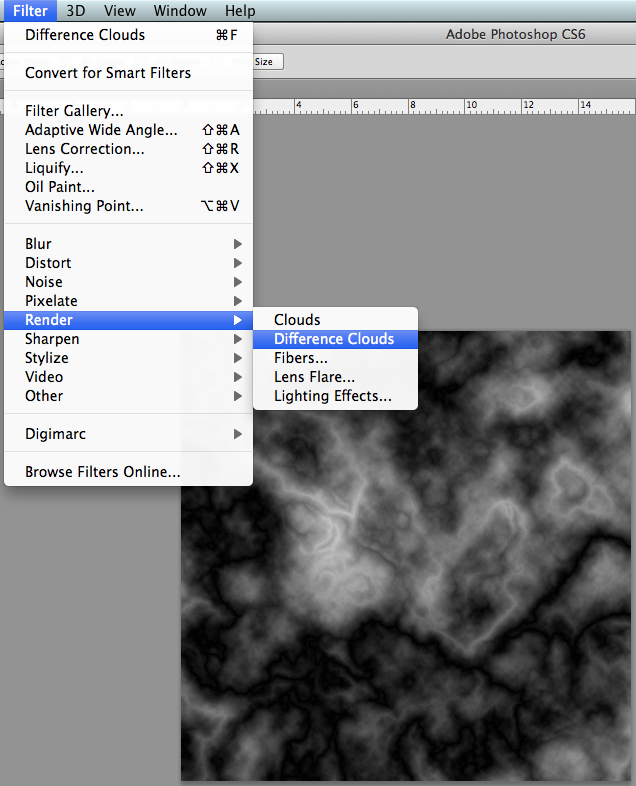
Render Difference Clouds
Again, go to the Filter Menu. This time, select Render/Difference Clouds. Repeat this eight times. A filter can be repeated easily by pressing the key command Control+F. This will repeat the last applied filter. You should now have a similar image as the screenshot.

Step Five
Define A Pattern
Go to Edit/Define Pattern.... Name the pattern "surface_texture" in the next window.

Step Six
Create a New Documet; The Planet Proper
Create a new document (File/New... or Control+N). This time, set the width to 1000px and the height to 1000px. Name it "Planet". All other options can remain the same.

Step Seven
Fill The Background
Set the default colours, as in step two, if either the forground or background colours have changed. Fill the image with Black (#000000). This can be done in one of two ways:
- Select the Paint Bucket tool ("G") & then click within the image.
- Use the fill dialogue by going to Edit/Fill... or by pressing Shift+F5. Select "Use: Foreground Color" from the Contents dropdown menu & press OK.

Step Eight
Create A New Layer
Create a new layer by going to Layer/New... or by pressing Control+Shift+N. Name the new layer "Planet Background".

Step Nine
Create A Circular Marquee
Using the Elliptical Marquee Tool (nestled under the Square Marquee tool ("M") in the tools pallette.), create a large, central, circular, marquee that fills roughly half of the image. See the screenshot for a visual guide. Fill this marquee with black, using either of the methods outlined in Step Seven.

Step Nine
Apply a Gradient
Create a new layer as in Step Eight, this time named "Planet Base". Do not deselect your marquee. Select the Gradient Fill tool nestled under the Paint Bucket tool (G). Set the foreground colour to #dcab99 & the background colour to black (#000000). Make sure Foreground to Background is selected under the tool options at the top of the window. On your Planet Base layer, drag the gradient tool from the top left of the marquee to the centre.

Step Ten
Setting Up the Surface Texture Brush
Select the Brush tool (B). Open the Brush Palette (Window/Brush or F5). Under the Brush Tip Shape menu in the Brush Palette, set the brush hardness to 0%. Under the Texture menu, click on the thumbnail & select the surface_texture pattern defined in Step Five. Untick the Invert box if it is ticked, Set Scale to 100%, Brightness to 0%, Contrast to 0%, tick Texture Each Tip, set the mode to Multiply, Depth to 100%, & Depth Jitter to 0%.
Step Eleven
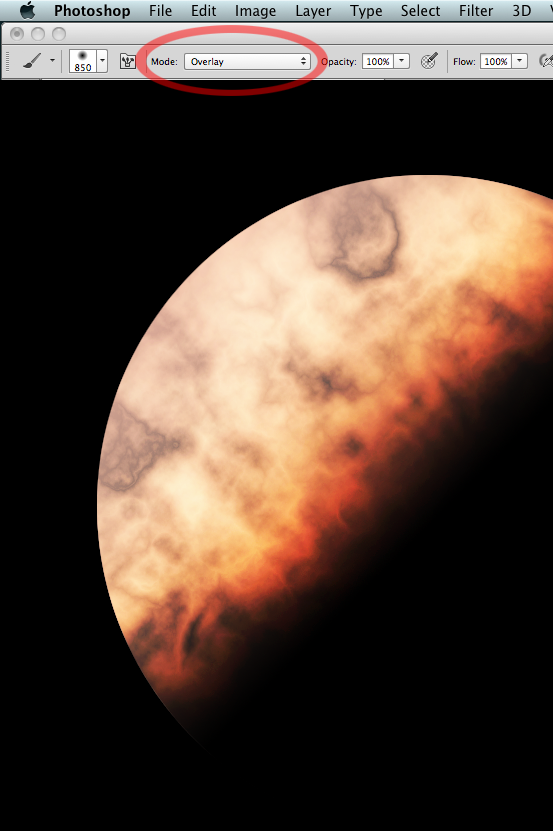
Appplying the Surface Texture
Set Brush Size to around 850px & Mode to Overlay in the tool options at the top of the window. With the brush tool, click on the coloured part of the gradient within the marquee several times, resulting in a similar result to the screenshot.

Step Twelve
Spherize
Apply a Spherize Filter (Filter/Distort/Spherize...) with an Amount of 100% & Mode set to Normal.

Step Thirteen
Duplicate Layer
Duplicate the Planet Base Layer (Layer/Duplicate...). Name the new layer "Shadows".

Step Fourteen
Emboss & Duplicate
Apply an Emboss Filter (Filter/Stylize/Emboss...) with an Angle of -45°, a Height of 4 Pixels, and an Amount of 100%.
Desaturate the layer (Image/Adjustments/Desaturate or Control+Shift+U).
Duplicate the Shadows layer, as in Step Thirteen. Call this newest layer "Highlights."

Step Fifteen
Adjust Levels
On the Highlights layer, open the Levels Window (Image/Adjustment/Levels... or Control+L). Set the leftmost box to 123. The image should resemble the screenshot.
Hide the Highlights layer by clicking the eye in the layers panel.

Step Sixteen
Adjust Levels ...Again
On the Shadows layer, open the Levels Window (as in Step Fifteen). This time, set only the rightmost box to 123.
Unhide the Highlights layer.

Step Seventeen
Blending Modes
On the Highlights layer, set the Blending Mode dropdown on the top of the Layers Palette to "Color Dodge", causing the dark areas of the layer to appear transparent.
On the Shadows layer, set the Blending Mode dropdown on the top of the Layers Paletter to "Color Burn", causing the light areas of the layer to appear transparent..

Step Eighteen
Setting up Masking on Effects
Select the Planet Base layer. Open up the Blending Options window by selecting it under the Layer Styles button on the Layers Paletter.
On the Blending Options: Custom menu, tick the "Layer Mask Hides Effects" box.

Step Nineteen
Adding A Layer Style Atmosphere
Select Inner Glow from the left menu. Click the yellow box & set the inner glow colour to #5dd3ff. Set the Size to 75px. Everything else can remain at the default settings.
Select Outer Glow from the left menu. Set the outer glow colour to #5dd3ff. Set the Size to 60px. Everything else can remain at the default settings. Press OK.

Step Twenty
Add A Layer Mask
Our planet has an atmosphere, but it realistically wouldn't show up on the side of the planet in shadow, so we'll hide the glow on the black side of the planet. Add A Layer Mask to the Planet Base layer by going to Layer/Layer Mask/Reveal All. Layer masks will hide parts of a layer depending on how dark the layer mask is at that location. The darker, the more transparent.
Deselect your marquee (Select/Deselect or Control+D). Select your gradient tool. Making sure the Layer Mask (The white square next to the Planet Base layer in the Layers Panel )is selected, & that white is your foreground colour & black your background colour, drag from the top left edge of your planet to the lower right edge.
Step Twenty-One
Add A Gradient Map
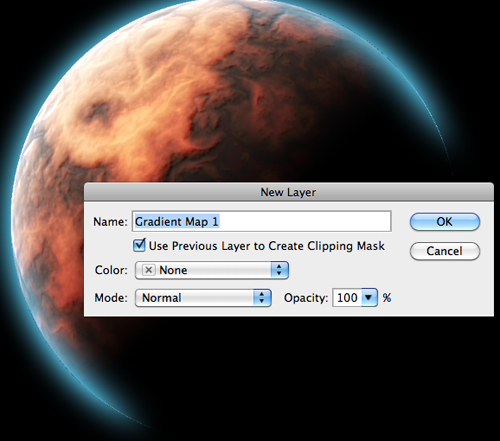
Making sure that Planet Base is the currently selected layer, add a Gradient Map by going to Layer/New Adjustment Layer/Gradient Map.... Name the layer "Gradient Map". Tick the "Use Previous Layer to Create Clipping Mask" box.

Step Twenty-Two
Editing the Gradient Map
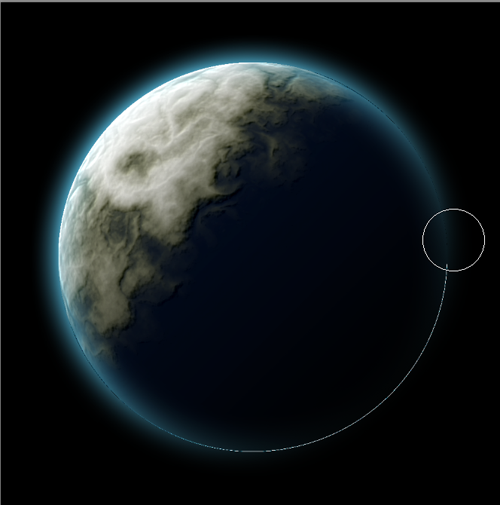
In the Properties Palette, open up the Gradient Editor by clicking the long bar with the gradient in it. The Gradient tool works by colouring areas of the image based on their lightness. The darker areas will coloured using the colour on the right of the gradient bar, & lighter areas will be coloured using the colour on the right of the gradient bar (similar to a topographic heat map). Colours can be changed by clicking on the coloured tab under the gradient bar, & colours can be added by clicking in the blank area underneath the gradient bar & removed by dragging them out of the blank area. Dragging the tabs will change what range of lightness they are colouring, & dragging the diamonds in between the tabs will affect how smoothly one colour transitions to another (this can be useful for creating the appearance of sea-shores, by dragging the diamond close to the "land" colour tag). A simple ocean, land & snow appearance can be created by setting the left-most tag's colour to white (#000000) & Location to 100%, the right-most tag's colour to #020e27 & location to 10%, & creating a third tage with a colour of #6a6c55 at a Location of 40%.
This tool allows a huge amount of customization over the appearance of the planet, & appearances will depend on how the clouds were rendered in Step Three. Less saturated colours generally work better but there is no single or "correct" set of colours to use in this step. Experiment!
Step Twenty-Three
Cleaning Up
It's quite likely that there is a white ring or black ring around the edges of your planet. These are artifacts left behind from the embossing process in Step Fourteen. These can simply be erased using the Eraser tool (E) from either the Highlights (for white rings) or Shadows (for black rings) layers.

Step Twenty-Four
Adding Stars
subtle stars can simply be added by selecting the very bottom layer and going to "Filter/Noise/Add Noise...". Set Amount to around 6%, Distribution to Gaussian, & ticking the Monochromatic box.

Step Twenty-Five
Adding a Ring to the Planet
Create a new layer called "Rings". Draw a long, flattened, Elliptical Marquee on this layer.
Using the brush tool (B) & a soft brush (make sure the mode is set back to Normal in the tools panel at the top of the window & that the texture box is unticked in the Brushes Palette (F5)), draw somewhat randomized splotches within the marquee, trying to avoid touching the edges, or drawing too heavily in the centre of the marquee. Pick colours out from your planet for a more consistant colour scheme by using the Eye Dropper tool (I or by holding down Alt while using the Brush tool).
Step Twenty Four
Twirling; Scaling; Positioning
On the Rings layer, go to Filter/Distort/Twirl... and set the Angle to 999°. Repeat this filter 2-3 times (F will repeat the last applied filter, remember!).
Go to Edit/Free Transform (or Control+T), & angle the rings around the planet. Press Enter. Create a new Layer Mask for the Rings Layer, & with the Gradient Tool, apply a Layer Mask in the same manner and style as in Step Nineteen.

Step Twenty Five
More Masking
In the Layer Palette, Control+Click on the Layer thumbnail of the Planet Base Layer. This will load a selection of everything in that layer. Select the Mask on the Rings layer. With a large, soft, black brush, paint over the and top of the rings (where they should be behind the planet.) Deselect your marquee, and there you have it!