

Illustrator guide
A guest tutorial by Siobhan Hokin

Overview
Illustrator Guide
This is a beginner-level guide on Adobe Illustrator. Its aim is to bring about an in-depth understanding of Illustrator's basic functions. I'll be using Illustrator CS4, so if you're using another version, certain icons and functions might be in different locations on the screen, or look different, or not be there at all, so be careful of that. I suggest you read through from beginning to end, while looking at and playing around with the software.

Introduction
Illustrator Guide
Adobe Illustrator is in a class of graphics programs that deal with Vector Graphics. These are images that are made of lines, called curves, which are coded with a particular kind of mathematical equation (bezier curves). This is in contrast to Raster Graphics, which are made of pixels - tiny coloured squares.
The biggest difference between the two file types can be seen best by zooming in. The pixels are visible when zoomed in on the raster image while the vector graphic remains smooth.
This difference means that pictures made in Illustrator are usually clean and clear making the program ideal for creating graphic design pieces such as logos, posters and infographs. It is, however, also possible to craft startlingly realistic 3D images, concept art and detailed illustrations.
Starting with Illustrator
Creating a new file
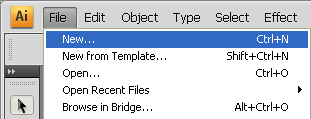
When you first open the program, the first thing you will probably want to do is create a new file. Along the top of your workspace is the menu bar. Under "file" you will find a number of expected functions, including new, open, save, and close.
When you click "new", a window will appear giving you the opportunity to define certain aspects of your file, including how many pages - "artboards" - you desire and the size of your artboards. (It is possible to edit most of this later, but specifying this info early is a good idea, and will save you the trouble.) Clicking okay will create this file, and give you a surface to work on.

Your Workspace
What you see now you have created a file
The workspace is the particular arrangement of all you see in your Illustrator window. It is possible to save different arrangements of these, but for this tutorial, we'll use the "Essentials" workspace - please go to Windows> Workspace, and click "Essentials". Even if it is already ticked, you may need to click it. This is especially important if you have been messing around Illustrator and have moved some stuff around.
The artboard is the white rectangular area in the middle of your screen, surrounded by a slightly greyer background. You can create objects on any part of the artboard or background, but only the objects on the artboard are printed, for instance, or kept when the file is turned into a .jpg. Essentially, it's your page, but you can create or keep things outside it, so long as you save it as a ".ai" file (the official Adobe Illustrator file type).

Tools
Illustrator's Basic Tools
Lined up on the left side of the screen, there are a number of small icons. Each of these represent a "tool" available in Illustrator. The image shows the names of the tools we'll be referring to in this tutorial. In addition, hovering your cursor on top of one of these icons in Illustrator for a couple of seconds will display the tool's name.
The tool icons with small black triangles in their bottom-right corners each have a drop-down menu, accessible by clicking down on the icon and holding for a couple of seconds. These contain other tools, similar to the one in the visible icon. If you choose a tool in one of the drop down menus, this is the tool that will appear in that icon's place in the toolbar.
Clicking and holding down the left mouse button over the rectangle tool button, we find the rounded rectangle, the ellipse, the polygon and the star tool, along with some others.
The hand and zoom tools let you shift you view of your file. The zoom tool zooms in and out: click on your workspace to zoom in, Alt-click to zoom out. The hand tool moves you around your work-area when clicking and dragging. However, it is far easier to use keyboard shortcuts for these two tools:
Holding down the space bar with any tool selected will enable the hand tool for as long as you hold it, allowing you to click and drag on your file to shift your view.
Holding down Alt (Option on a Mac) while scrolling with the mouse wheel zooms in and out without the requirement to select the tool.
Holding down ctrl while pressing + or - also zooms in and out.

An essential function
Selecting
Before using certain functions, you will often need to select the object you wish to affect or deselect an object so that it is not affected. This is done with the Selection tool, the tool depicted by the black arrow. To select an object, click it once with the selection tool active. This tool also allows you to move objects around by clicking and dragging them.
Holding down ctrl while on any other tool will take you to the last used selection tool - either the Selection tool or the Direct Selection Tool (the tool depicted by a white arrow).
To select more than one object, hold down shift when clicking the objects with the selection tool. If you click a selected object again with shift held down, it will be deselected.
Another method of selecting more than one object is to click and drag on the artboard or background with the selection/direct select tool. Any object that has any part of it within the click-and-drag square will be selected.
Another important function Illustrator is grouping, which "sticks together" a number of objects, so that whenever one object in a group is moved or selected, so are the rest. This can be done with the keyboard shortcut ctrl+g while the objects you want in the group are selected. Object>Group also does this. To ungroup objects, use ctrl+shift+G.

Creating Shapes
Various Methods
Regular geometric shapes are created using the tools hidden under the rectangle icon. Clicking and dragging on the page with one of these tools selected will create a shape of varying size. If you simply click on the page, a window of options will come up, giving you the opportunity to state more clearly what you desire.
Using a free-hand tool - the Pencil Tool, the Brush Tool or the Blob Brush Tool - you can create as many shapes as freely you might with a pen and paper. However, unless you are using a drawing tablet, great steadiness of hand would be required to produce something of similar quality as you could with a pen on paper.
The most versatile and useful tool for shape-creation in Illustrator, therefore, is the Pen tool. This will be covered in depth in a later section.

About
Arranging Objects
Arranging objects is a pretty basic function in Illustrator. Each object exists on it own level, and you can move objects up and down, so that instead of being on top of another object, they are now underneath, or vice versa.
This can be done either at Object> Arrange (go to the menu option "Object" and click arrange in the drop-down) or:
Clicking down ctrl and the right bracket (]) brings the selected object forward one.
Clicking down ctrl and the left bracket ([) sends the selected object back one.
Clicking down ctrl and shift and the right bracket (]) brings the selected object all the way to the front.
Clicking down ctrl and shift and the left bracket ([) sends the selected object to the very back
Transforming shapes
With the selection tool
There are a couple of ways to transform paths/shapes. The easiest to use is the Selection tool.
After selecting your shape with the Selection tool, a box surrounds the shape, with a couple of dots that look like anchor points attached to the corners and mid-points. Hovering your cursor on top of one of these points turns your cursor into a set of arrows. If you click and drag on these arrows, you will be able to stretch and scale your shape. If you hold down shift, it will scale to the same ratio. If not, your shape will be stretched.
Hovering your cursor just outside one of these points will let you click and Rotate the object.
Holding down Alt/Option and clicking and dragging your shape will create a copy of the shape, leaving the first where it was.

Transforming shapes
Specific Tools
Otherwise there's the rotation tool (1) - click and drag anywhere on the image to rotate the selected object. And the scale tool (2) - click and drag anywhere on the image to scale the selected object. Alt+click on the work area with the tool selected opens the options for these two tools.
There is also the free transform tool (3), which works in much the same way as the transformation functions of the selection tool.
The third method of transforming objects is to use the Object> Transform options, which open option windows. There is a flip option here - "Reflect". If you find that your strokes are becoming too thin or too thick when scaling, use the Object> Transform> Scale window and tick "Scale strokes and effects".

Introduction to the:
Pen Tool
The Pen Tool, as mentioned before, is an extremely useful tool for complex shape creation. Unfortunately, it is also one of the hardest to master.
Virtually all shapes in Illustrator are created by paths - the bezier curves mentioned in the introduction. These are lines that follow a set of guiding anchor points. If you messed around with the pencil tool earlier, you will have noticed that a thin line with occasional dots was created on top of the line you drew. This is a path. The pen tool lets you place and manipulate those guiding points, one after the other, giving the user the most control over the path possible.

Pen Tool cont.
Dealing with Anchor Points
When you have selected the pen tool, click-and-hold on your artboard and drag your cursor upward. A point much like the one depicted in (1) should appear, an anchor point with two "guides". If you do not click-and-drag, and merely click, you will get a point with no guides. Any section of a path that has no guides will just be a straight line between the two anchor points. Make another couple of points (not a million, you'll just have a mess), and then click again on your first point. This should, if you have clicked on it properly, connect your first point to your last, creating a solid shape, as in (4).
You can move your entire path around by using the Selection Tool - the black arrow - and you can use the Direct Selection Tool - the white arrow- to move individual anchor points and guides.

More Pen Tool
Tools that extend the pen tool
There are a couple of tools that appear when you click and hold down the pen tool icon. These add extra functions that are helpful when dealing with paths.
The "add anchor point" tool adds a point when you click on a path section.
The "delete anchor point" tool removes a clicked point.
These two tools are also part of the automatic functions of the regular pen tool. This means that even when you're using the regular pen tool you can click on a point to delete it, or click on a section of path to put an anchor there. However, doing this when you don't have the specific tool selected will sometimes have a different effect than you would expect, so being aware of the click-and-hold tools is a good idea.
The "convert anchor point" tool removes guides from a clicked point, and adds guides if you click and drag a point without them. In addition, clicking and dragging a guide with the "convert anchor point" tool breaks the connection between the point's two guides, allowing them to be moved independently.
Holding down Alt (or Option) when first placing a point also forces the guides to move independently, and this allows much greater speed and control when creating paths. This function will be demonstrated in the next section of this tutorial.

Pen Tool Tute
A small demo/tutorial
The images demonstrate the steps in making a simple cashew shape with the pen tool. The red arrows indicate the dragging-direction.
First, click and drag towards the top, left hand corner.

Pen Tool Tute
Part two
Click again, a little way to the right, and drag down towards the bottom right hand corner. DO NOT un-click the mouse. Press down alt, and hold...

Pen Tool Tute
Part Three
Still holding down the left mouse button and alt, drag the now detached guide up towards the top, right hand corner of the screen as shown in this third image.
If you failed this step, either undo (edit>undo, ctrl+z) and try again (it'll be worth it to learn this technique!) or use the convert anchor point tool to detach and drag the guide.

Pen Tool Tute
The fourth point
Click again and drag down as shown in the image.

Pen Tool Tute
The last step
Click again on your first point. This completes the path!
In general, the less points you have, the cleaner and more pleasant your path will look.
It is now possible to add colour to our shape!

Adding colour
Introduction to the colour palette
To the right of the screen there are a number of small window/menus called palettes, the top of which is the colour palette. Colour is chosen through a mixture of 4 "pigments", as in printing - Cyan (C), Magenta (M), Yellow (Y) and Black (K). You drag the small white triangles along the bars to indicate the amount of each.
You might have an alternate set of colour bars - such as Red/Green/Blue bars, or Greyscale. To switch to CMYK, click the option button, labelled 3 in the image, and click CMYK.
The two overlapping squares on the left side of the palette allow you to choose between colouring the stroke (the line on the outside) or the fill (the area inside). The fill box is labelled (1), the Stroke box is labelled (2)

Adding colour
Working with the colour palette
First, select your cashew shape with the selection tool, then click the fill box. Input the values shown in the image while having the fill selected. The shape will be filled with this dark purple. Typically, the further apart the sliding handles of C, Y and M are, the more intense the colour will be, and the closer together they are, the closer to grey (or white, or black) the colour will be.
Strokes can be added and edited using the Stroke Palette (picture) found on the right side or at Window > Stroke
Underneath the CMYK bars, there is one that appears to be filled with a rainbow, from which you can pull out almost any colour you might like, just by clicking on it.

Removing colour
"None"
Next to the rainbow-bar, there is a square with a red line across it, which is labelled "none" if you hover your cursor over it. It can be clicked to make whatever object fill or stroke you have selected see-through.
- The cashew shape is filled with white and on top of another illustration. It has a 3 pt stroke in dark brown.
- The shape is selected, showing the white fill-box square in top of the brown stroke-box in the colour palette.
- The "none" square has been clicked. The shape is now see-through, but still has its brown stroke. The picture underneath can be seen.

Adding Colour
Gradients
Another method of colouring is to add gradients - smooth progressions from one colour through to one or more other colours. This can look very cool, but it can also be used badly, and overused. First, select your shape, and go to the gradient palette (on the right or at Window> Gradient)
From here you can alter the basic gradient by double clicking one of the small squares below the gradient bar - these are called gradient sliders (and you can slide them). If you can only choose a grey, click the icon in the top right corner of this newly opened window/box and select CMYK as depicted in the image.
From there you can pick whatever colour you want, and do the same for the other gradient slider. Other gradient sliders can be added by clicking just underneath the gradient bar, and can be taken away by clicking and dragging the slider down. These can also be double-clicked and the colour changed, and slid along the bar. The closer together the sliders are, the more abrupt the colour change will be.

Adding colour
The Gradient Tool
The gradients can either be linear (one colour to another in a straight line) or radial (the colours emanate out from a point.) - notice the drop-down box for this.
To alter the direction or positioning of the gradient, you can either type the angle into the angle box clearly marked with an angle symbol in the gradient palette, or you can use the gradient tool which exists entirely to help you reposition a gradient. Clicking and dragging inside or around your shape with the gradient tool selected lets you do that.
To copy colouring
The eyedropper tool
The eyedropper tool allows you to copy the stroke and fill styles of another shape or pick out a colour from an image. First, select the shape you want to edit, then select the tool and click on the object you want to copy the colouring from.

Writing things in Illustrator
The text tool
To write in Illustrator, you use the text tool. You can type along in a line, type words constrained inside a box, type along a path, and inside a path.
The easiest way to use it is to select the text tool, and click and drag on your document, making a box to type in.
This is then much the same as any word processor - select any piece of the text you want to change. Options to change the font, size and style of text, as with many of the options in Illustrator, appear up the top.
Other word processor type options can be found by going to Window>Type>Character and Window>Type>Paragraph or clicking the words Character and Paragraph in the options-up-the-top.

The text tool
Other methods of setting up a text area
To type in a line, you can click on your document anywhere, and you'll be able to type there. The only difference between this method and the typing in a box method is that if you align your text right instead of left, it will do what the second line has in the top image, and stick to the point where you clicked, going in the other direction. It won't be able to align itself to the right side of the text box, because there is no text box, and no right side.
To type along a path, first, make the path. Then, select the type-on-a-path tool, from the drop-down menu accessible by clicking and holding the type tool icon. Then, click the path.

You may be lost
The outline view
There is a way of viewing your file which shows only the paths, and no other information. This is called the outline view, found at View> Outline, and can be very useful for tracing, dealing with overlapping paths, etc. You might, when first starting out, get to this view accidentally by pressing ctrl+y. To get out of the outline view, press ctrl+y again, or go to View> Preview. This will take you back to the usual full-information view.

last but not least
A short overview of things not to be covered in full:
Other palettes:
Colour guide palette: Shows variants of colours that blend harmoniously with your current colours.
Swatches palette: A number of preset colours, and colours can be dragged and dropped here from the colour palette to store them. Dragging objects from the artboard results in a pattern swatch. Click to apply to selected object.
Brushes palette: This is used with the brush tool to add extra effects to lines.
Transparency palette: Lets certain objects become part-way transparent and so interact with the objects behind them.
Layer palette: Much like the layer function in photoshop, allows you to divide your stacked objects into layered groups. This is also where you can lock, turn objects invisible and rearrange the vertical orientation of objects.
Pathfinder palette (Window> Pathfinder): Lets you create one path from two - can be used to cut one shape out from another, to add two shapes together to make one, to create a shape from the over-lapping area of two shapes, and a number of other functions
Align palette(Window> Align): Lets you align objects on the page with respect to the artboard and other objects. Can be used for centering and evenly spacing objects as well as aligning to the top of the page.
The effects menu: Lets you add certain visual effects to objects.

And finally
Conclusion
And that marks the end of this tutorial! Hopefully by now you are reasonably confident using Illustrator. There are many other tutorials, on this website and on the web in general, that you can use to further your skills.
In the meantime, I hope this was both informative and enjoyable!